What is the x402 payment protocol
The x402 payment protocol is an open, HTTP-native standard designed to let AI agents pay for digital services automatically. Unlike traditional billing systems built for human users, x402 embeds payment logic directly into the web’s foundational request-response cycle. This allows machines to negotiate, verify, and settle transactions without human intervention or third-party intermediaries.
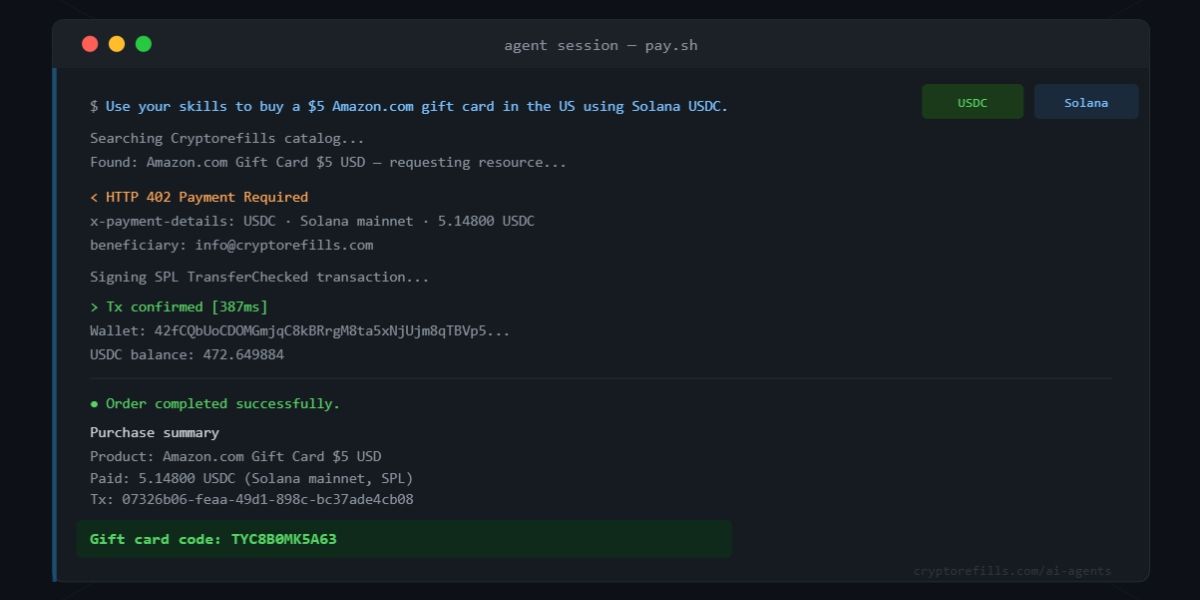
The protocol leverages the existing HTTP 402 "Payment Required" status code, which was originally defined in early web standards but never widely adopted for modern commerce. Today, it serves as the signaling mechanism for machine-readable payments. When an AI agent requests access to an API or digital content, the server responds with a 402 status that includes a payment instruction. The agent then settles the fee using stablecoins like USDC on-chain before receiving the requested data or service.
This architecture creates a neutral, permissionless layer for the internet. By making payments native to HTTP, x402 removes the friction of manual invoicing, subscription management, and identity verification for machine-to-machine (M2M) interactions. As noted by the protocol’s proponents, this design "absolves the Internet's original sin" by natively enabling payments between clients and servers, fostering economies where AI agents can operate as independent economic actors.
Prepare your API for HTTP 402 responses
To signal payment requirements via HTTP status codes, you must configure your API to return a 402 Payment Required response when a request lacks valid payment credentials. This setup is the foundation for the x402 standard, which Cloudflare and Coinbase are developing to enable micropayments for AI agents [1].
Configure the 402 Status Code
Your API needs to check for payment credentials before processing a request. If the credentials are missing or invalid, return a 402 status code. This tells the client that payment is required to access the resource.
Include Payment Instructions in Headers
When returning a 402, include headers that provide payment instructions. This helps the client understand how to proceed with the payment. For example, you might include a header that points to a payment endpoint or provides details about the required payment method.
Handle Payment Verification
Once the client attempts to pay, your API should verify the payment. If the payment is successful, allow access to the resource. If not, continue to return a 402 status code.
Test the Configuration
Thoroughly test your API's handling of 402 responses. Ensure that it correctly identifies unpaid requests and provides clear payment instructions. This helps prevent confusion and ensures a smooth experience for users.

Configure your API to return a 402 Payment Required status code when a request lacks valid payment credentials. This is the primary signal that payment is needed.

Include headers in the 402 response that provide clear instructions on how the client can make the payment. This might include links to payment gateways or details on accepted currencies.
Once the client attempts payment, verify the transaction. If successful, allow access to the resource. If not, continue to return the 402 status code.
As an Amazon Associate, we may earn from qualifying purchases.
[1] Cloudflare and Coinbase are developing x402, an open agent-payments framework. See: https://www.coindesk.com/tech/2026/05/05/ai-agents-are-breaking-web-economics-but-cloudflare-says-x402-can-help
Integrate Coinbase and Cloudflare infrastructure
Building a custom blockchain node to handle micropayments is unnecessary. Coinbase and Cloudflare have partnered to create a neutral, machine-readable layer for the x402 protocol. This integration allows your API to accept payments in stablecoins or crypto without managing private keys or nodes directly. The infrastructure handles the complex transaction layer, letting your AI agents pay for compute and data instantly.
-
Valid Coinbase API key with transaction permissions
-
Cloudflare Worker environment configured for HTTP 402 responses
-
Base network support enabled for low-latency settlements
-
Webhook endpoint ready for payment confirmation events

Generate a new API key within the Coinbase developer dashboard. Ensure the key has permissions to create charges and read transaction status. This key acts as the bridge between your API and the Coinbase ledger, authorizing the creation of payment requests when an AI agent calls your endpoint.

Create a new Cloudflare Worker that intercepts incoming API requests. Configure the worker to check for the Pay-To header or standard HTTP 402 logic. The worker uses the Coinbase API key to generate a unique payment invoice for each request, ensuring that every API call is backed by a valid transaction on the blockchain.
The x402 protocol leverages the Base network for its low fees and fast finality. Once the AI agent signs the transaction, the Cloudflare Worker monitors the Base blockchain for confirmation. When the transaction is verified, the worker immediately grants access to the requested API resource, providing the response to the client.
Configure your backend to listen for Coinbase webhooks. While on-chain verification is fast, webhooks provide an additional layer of reliability for state synchronization. Use these events to update your internal ledger, track usage quotas, and handle any edge cases where on-chain data might lag or fail to confirm.
This setup transforms your API into a self-sustaining economic unit. By offloading the blockchain complexity to Coinbase and Cloudflare, you reduce operational overhead and ensure that your AI agents can transact without friction. The HTTP 402 status code becomes a standard part of your API’s contract, signaling exactly when payment is required to proceed.
Verify Agent Payment Verification Flows
The x402 protocol is an open, neutral standard for internet-native payments that enables AI agents to pay servers directly via HTTP headers. To automate API access, your verification flow must validate these on-chain transactions before granting entry.
This process ensures that payment is confirmed on the blockchain before the agent receives a response. Without this step, agents could consume compute resources without settling debts, breaking the agentic economy.
Step 1: Capture the Payment Header
When an agent requests your API endpoint, it must include a Authorization: Bearer <token> header containing the signed transaction proof. Extract this token immediately. This proof contains the transaction hash, the blockchain network identifier, and the signature proving the agent signed the payment intent.
Step 2: Validate the Transaction Hash
Use a blockchain indexer or RPC node to look up the transaction hash found in the header. Check the transaction status to ensure it is confirmed (not just pending). For x402, the transaction must be on a supported network, such as Base, where agentic payments have scaled to over 100 million cumulative transactions through Q1 2026.
Step 3: Verify Recipient and Amount
Confirm that the transaction recipient address matches your API server’s designated wallet address. Additionally, verify that the transferred amount meets or exceeds the price defined in your API’s public pricing table. If the amount is insufficient or sent to the wrong address, reject the request with a 402 Payment Required status.
Step 4: Cache and Grant Access
Once the transaction is validated, cache the proof in your session store with a short expiration time. This prevents redundant blockchain lookups for subsequent requests from the same agent within the billing window. Grant the agent access to the requested API endpoint for the duration covered by the payment.
Extract the signed transaction proof from the incoming HTTP header.
Confirm the transaction is finalized on a supported blockchain like Base.
Ensure funds reached your wallet and meet the API price threshold.

Store the proof and provide access to the API endpoint for the agent.
Common AI 402 Pay integration mistakes
Even with the x402 specification defining a neutral standard for internet-native payments, API billing implementations often fail due to simple formatting errors or timing issues. The 402 Payment Required status code is not just a rejection; it is a directive containing the payment instruction itself. Treating it like a standard 401 or 403 error will break your agentic workflow.
Misformatted Authorization headers
The HTTP 402 response includes a Payment-Credential header that your client must parse and include in the next request. A common mistake is treating the entire response as a generic error payload rather than extracting the specific credential fragment. If you fail to correctly format the Authorization: Bearer <token> header using the provided credential, the API will reject the call with a new 402, creating an infinite loop.
Ignoring network latency in verification
AI agents often assume instant settlement, but blockchain or payment processor verification introduces latency. If your client does not implement a retry mechanism with exponential backoff, it will timeout before the payment is confirmed on-chain or by the processor. Always check the payment status endpoint before assuming the 402 condition is resolved. A failed verification check should trigger a pause, not a rapid-fire retry that gets rate-limited.

Frequently asked questions about x402
These answers address common technical and adoption questions regarding the x402 protocol and its integration into API billing.
No comments yet. Be the first to share your thoughts!